Transform Your Store: Customizing Shopify Themes!
By Admin on

Customizing a Shopify theme to perfectly match a store’s branding and needs isn’t straightforward. While there are numerous pre-made Shopify themes available, finding one that exactly fits a store’s requirements is often challenging.
Crafting an on-brand checkout page, incorporating social media elements, and applying store-wide updates for seasonal events are among the notable difficulties encountered. For store owners, dedicating time to learn coding for theme design isn’t practical. This is precisely why learning to utilize Shopify customization tools can be invaluable. These tools enable the creation of the perfect theme without needing to understand coding.
Shopify Customization 101: Creating a Custom Theme vs Editing an Existing Theme
When it comes to Shopify customization, there are numerous methods to alter the theme to fit specific preferences. However, the decision typically comes down to one of two choices:
- Creating a custom theme with the assistance of a developer
- Modifying the existing theme independently.
Both options can be suitable depending on the objectives. Therefore, examining the pros and cons of each is essential to determine the best fit.
Shopify Customization Option 1: Create a Custom Shopify Theme
Creating a custom Shopify theme allows for the perfect template to complement an online store. However, given the abundance of themes available for Shopify, the necessity of crafting a custom theme might not be apparent to everyone.
Pros of Creating A Custom Theme
Complete Control: Designing a custom theme enables the appearance of the storefront to align with the company’s goals, vision, and content, as opposed to fitting a brand into a pre-designed template that may not fully represent it.
Differentiation from Competitors: Creating something unique can distinguish a store from its competitors and secure a distinctive space in the consumer’s mind.
Cons of Creating A Custom Theme
Yet, embarking on the journey of developing a custom theme comes with its set of challenges:
Hiring a Shopify Theme Developer: Finding and hiring a high-quality developer can be cumbersome and pricy, especially for individuals running their businesses solo.
Ongoing Maintenance: Custom themes demand extensive manual upkeep, particularly with each platform update, necessitating continuous collaboration with a developer to ensure compatibility.
Questionable Viability for Smaller Stores: For smaller or newer stores, the investment in a custom theme might not justify the cost, making pre-existing themes from the Shopify theme store a more practical choice.
Based on collective experience, pursuing a custom theme may not be the most advantageous path for the majority of Shopify entrepreneurs, especially those just beginning their journey.
However, for enterprise-level stores with substantial budgets and a clear design vision, exploring custom theme options could be beneficial. In such instances, arranging a consultation with a specialized agency to discuss possibilities could be a worthwhile consideration.
Shopify Customization Option 2: Use the Theme Editor & Do it Yourself
Shopify boasts an impressive collection of high-converting themes, many of which are freely available. This is why it’s often recommended that merchants choose a theme and personalize it on their own.
At first glance, the theme editor might appear overwhelming with its myriad of options and settings. However, it’s certainly more user-friendly than one might initially think.
The Pros of the Shopify Theme Editor
- Automatic Maintenance: Opting for a pre-built theme means maintenance is simplified.
- Less Upfront Cost: The Shopify theme store offers paid options that are generally more affordable than commissioning a developer to create an entire store.
- Plenty of Options for Customization: The Shopify theme editor is equipped with a vast array of customization options suitable for most stores.
The Cons of the Shopify Theme Editor
- Lack of Full Control: Although the editor offers numerous options, using a pre-built theme doesn’t afford the same level of customization as a fully custom theme would. This might pose a concern for very large brands, but for smaller operations, there are typically more pressing challenges to address.
Deciding between a custom theme or modifying a pre-built theme depends on individual business needs. For those considering custom development, beginning consultations with a Shopify expert is a recommended start.
The remainder of this guide will delve into selecting a theme and editing it independently, as this route is deemed most fitting for the majority of merchants.
How to Pick a Shopify Theme to Customize
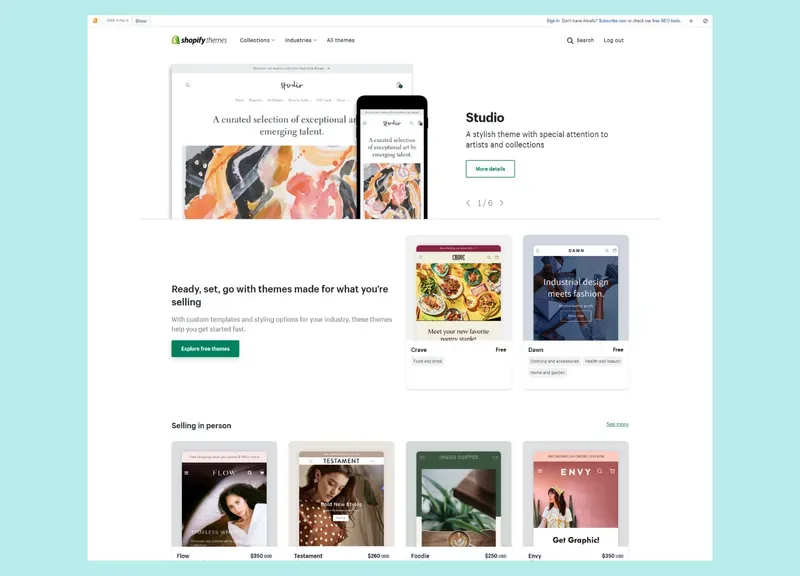
To begin customizing a store, selecting a theme is the first step. A theme acts as the foundation or template for the store’s design. A wide range of themes can be explored in Shopify’s theme store. It’s recommended to browse this platform to find a theme that resonates with your brand’s identity.
At the Shopify theme store, there is an assortment of both free and paid themes. Furthermore, themes can be filtered by industry, making it easier to find a layout that suits specific needs. Exploring a variety of catalogues, even outside one’s immediate industry, is advised. This may lead to discovering a theme that unexpectedly meets the store’s requirements. Once a suitable theme has been identified, it can be installed to the store.
A tour of the default theme, Dawn, will be provided to illustrate the capabilities and aesthetics of the theme editor.
Shopify Theme Customization: How to Use the Theme Editor
After selecting a theme, the next step involves tailoring it to the brand identity through the theme editor. This tool, known as the Shopify theme editor, functions as a page builder. It facilitates the creation of store-wide templates and implements changes to ensure that every page aligns with the brand’s image.
1. How to Access the Shopify Theme Editor
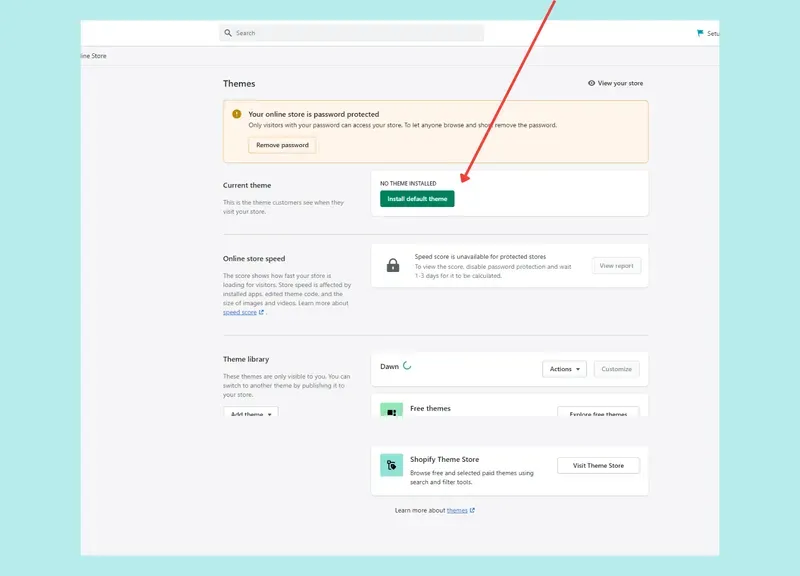
- To start customizing a store’s look, one should first head to the Shopify admin panel.
- Next step involves going to the Themes section, found towards the bottom.
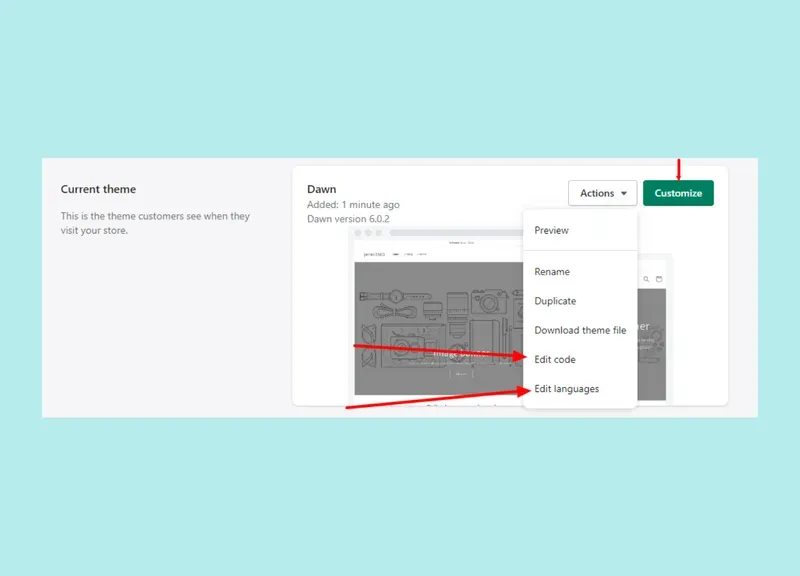
- If a theme has not be selected yet, one can install the default theme available on the screen.
- Upon installing a theme, clicking Customize opens up the theme editor.
- Clicking on the Actions menu will unveil additional options.
- Selecting Preview option allows for the viewing how the store appears, even if it’s yet to be published.
- Edit languages offers a way to ensure all common phrases align with the brand’s tone. (For example, changing “Shipping Price” to “Shipping Fee”)
- Lastly, Edit code gives the option to alter the theme’s code directly.
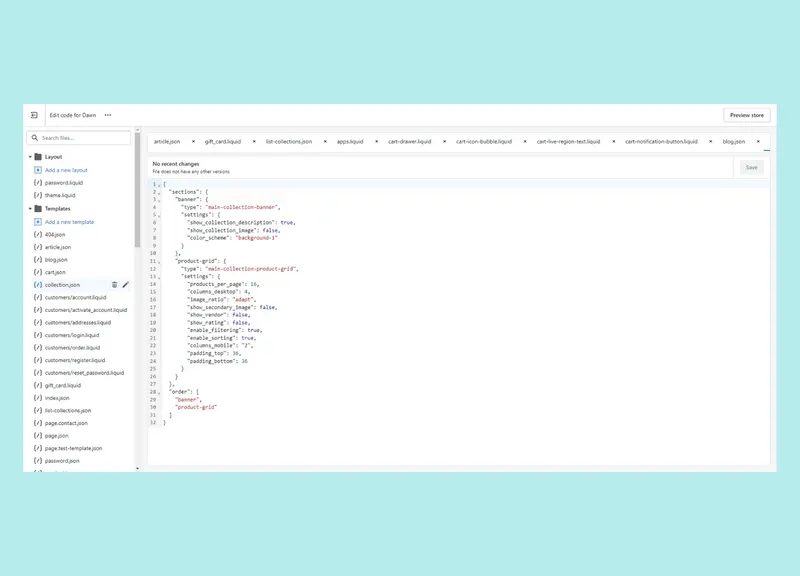
However, modifying a store’s code is not advised due to the potential risk of disrupting the theme.
2. The Most Important Theme Editor Sections for Customizing Your Store
The Shopify Theme Editor comes with various essential features that enhance the theme customization experience. Here’s a breakdown of the key features:
a) Create Pages With The Template Editor
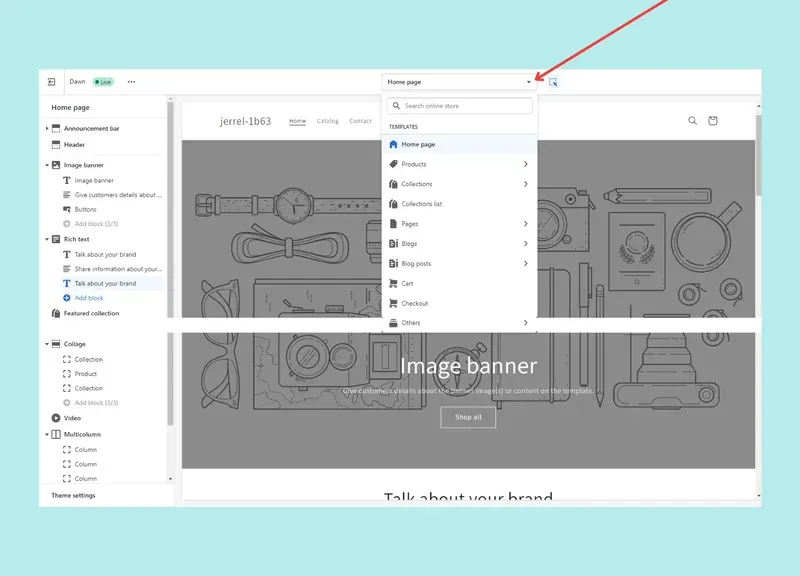
The Template Editor is a powerful tool allowing the creation of page templates. This feature drastically simplifies the process of designing website pages by enabling the creation of a single template that can be applied across multiple product pages, thereby saving valuable time. Users can navigate to their templates through a dropdown menu in the Theme Editor, creating and customizing templates for different page types with ease.
b) Add Your Social Media Accounts
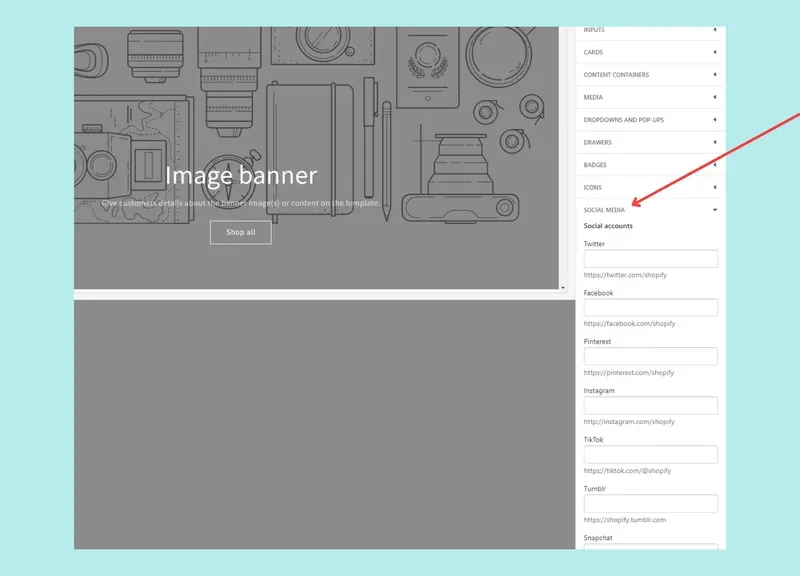
The Theme Editor also hosts a Settings section, which, among other tabs, contains the Social Media section. This particular section is instrumental in linking the store’s social media pages directly to the site. By doing so, each social media icon embedded on the site leads directly to the corresponding social media page, streamlining the integration process.
c) Design Your Store’s Pages With The Section/Block Editor
The Section Editor is where creativity comes into play within the Shopify Theme Editor. It presents a variety of icons and sections that can be customized to fit the store’s aesthetic needs. Users can add, remove, and adjust these sections to personalize each page.
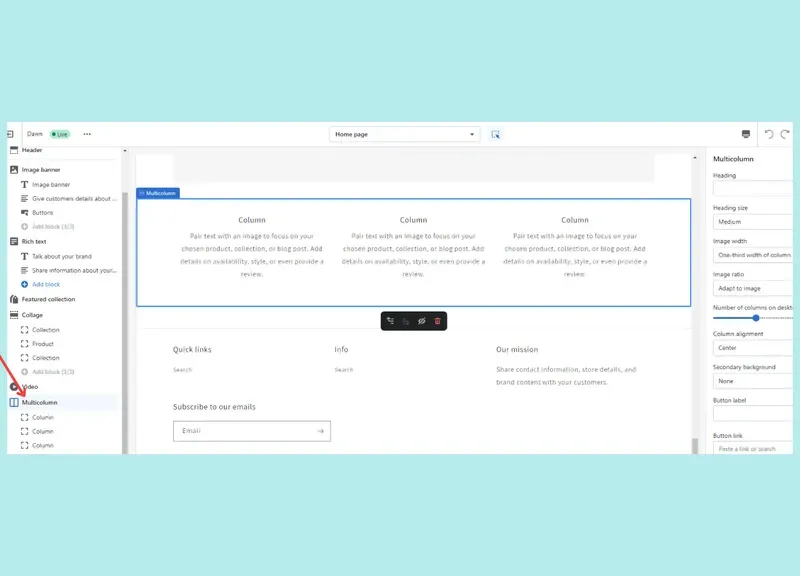
d) Customize Fonts & Colors With the Style Menu
The Style Menu’s functionality varies across different themes. While the default Dawn theme primarily allows reverting back to the original style settings, other themes offer more versatility in customizing the store’s overall look and feel, making it possible to adapt design elements for special occasions or broader visual updates.
e) Use the Mobile Previewer to Ensure Optimal Display
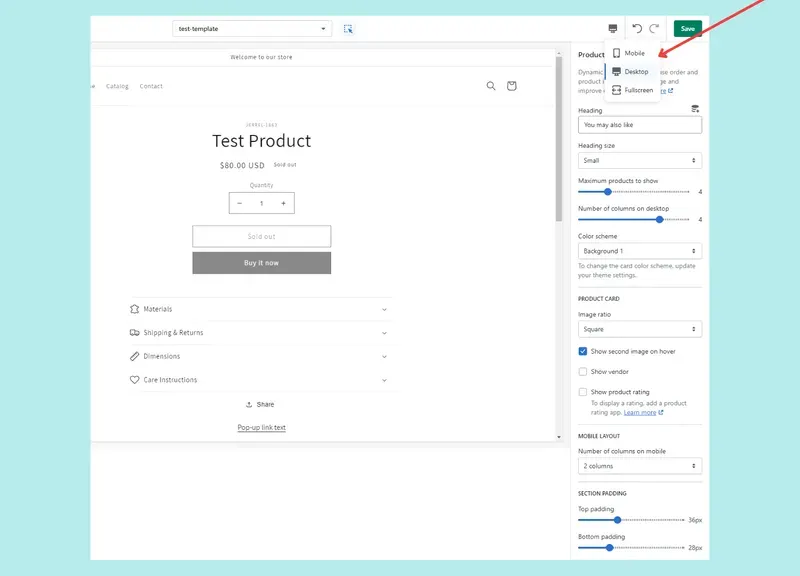
Lastly, the Mobile Previewer feature is crucial for ensuring that the store looks flawless across various devices, including desktops, mobile phones, and tablets. This tool provides a preview of how the store appears from a mobile user’s perspective, facilitating adjustments for optimal user experience.
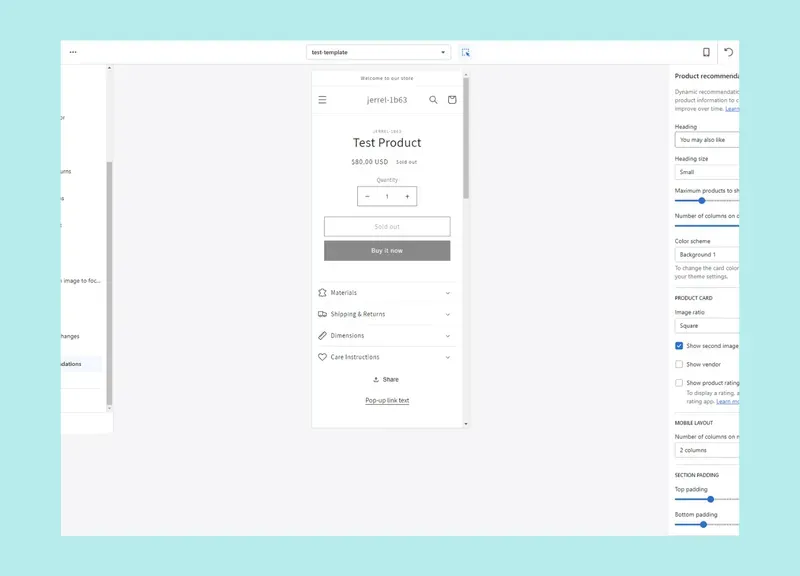
3. How to Use the Shopify Block Editor to Customize Your Theme
Modifying a theme using the Theme Editor is quite manageable, even for those without coding expertise. Here’s a guide to ease the process.
a) How to Add & Remove Blocks in Shopify
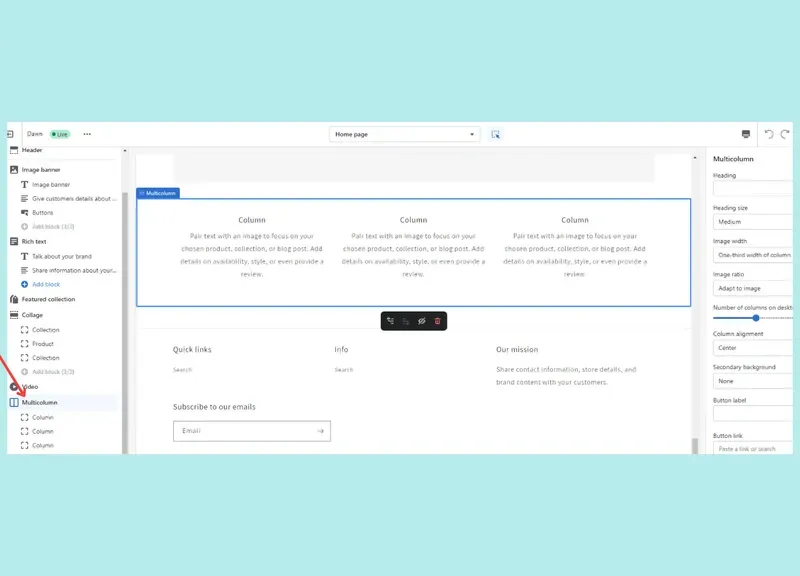
The Theme Editor delineates the structure into sections, blocks, and columns, establishing a clear hierarchy. Sections encompass the larger segments of a page, while blocks and columns make up these sections. For example, an image banner could represent a section, with the image and a button over it acting as blocks within that section. While columns and blocks serve similar functions, the term “blocks” will be used predominantly here.
By navigating the left sidebar, users can easily add sections or blocks by selecting Add block or Add section. To remove them, one simply needs to choose the unwanted section or block from the sidebar, then click on Remove located at the bottom right of the interface.
b) How to Edit Blocks in Shopify
Editing a block starts with selecting it from the sidebar. This action reveals a list of adjustable options on either side of the screen, enabling customization to align with one’s vision.
Although Shopify restricts direct drag & drop functionality and certain elements cannot be repositioned, ample flexibility remains to create an aesthetically pleasing page. Users can click on the eyeball icon in the sidebar to preview how the store looks without specific sections or blocks.
c) How to Move Blocks in Shopify
Moving a block within the Shopify Theme Editor is straightforward. Hover over a sidebar item until six dots appear, then click and drag the item to a new location within the sidebar. This will automatically adjust the item’s position on the page.
Shopify Customization: Using Templates to Streamline Store Design
Customizing Shopify themes can be significantly expedited by utilizing templates, which streamline the entire process with just a few clicks.
1. How to Use the Template Editor on Shopify
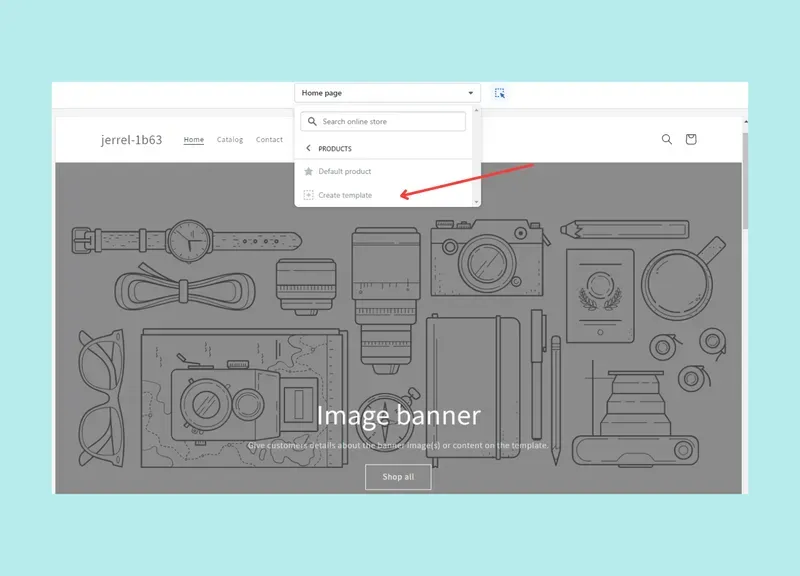
The Shopify Template Editor offers the capability to establish default templates that are automatically applied to each page. A new template can be initiated by selecting an option from the middle dropdown menu. Items marked with an arrow icon indicate their compatibility with templates.
By simply clicking on the desired item followed by the Create template button, users can begin the process. After this step, the page can be edited in the same manner as any other.
2. How to Add New Pages to a Shopify Store
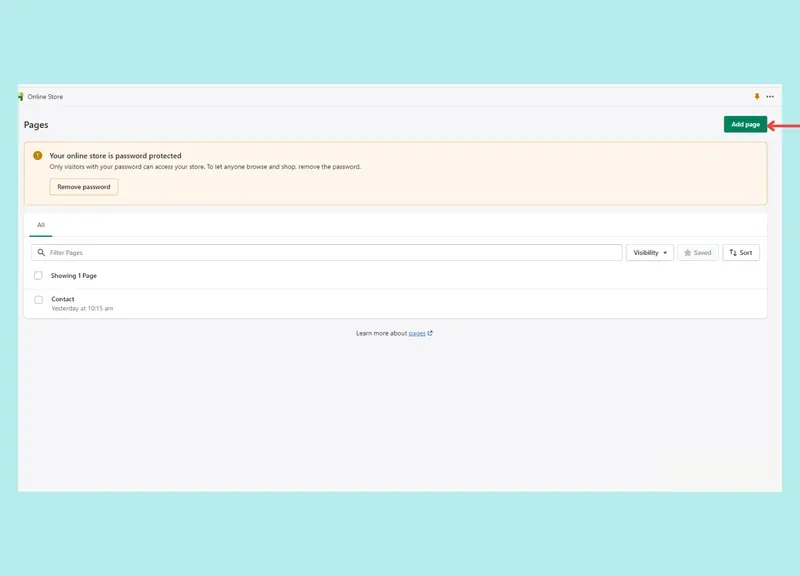
To utilize new templates, it may be necessary to create new pages on the store. Creating a new page is straightforward. One simply needs to navigate to the Pages screen found under the Online Store section. From this location, click the button located near the top-right corner labeled Add page.
3. How to Assign Page Templates on Shopify
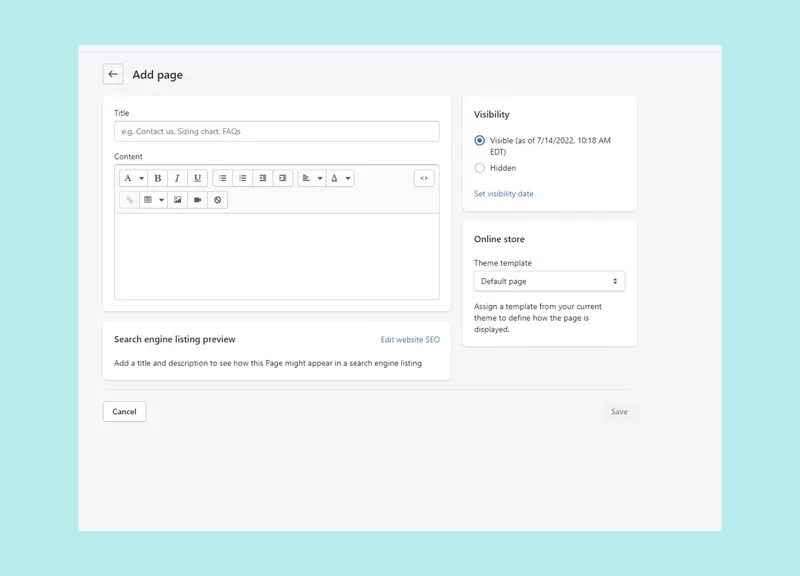
To change a page template in Shopify:
- Go to the Pages tab within the admin dashboard.
- Choose the specific page for the template change.
- In the product page interface, look for the Theme template dropdown menu.
- From the dropdown, pick the new template desired.
- Finalize the process by clicking Save.
4. How to Assign Product Page Templates on Shopify
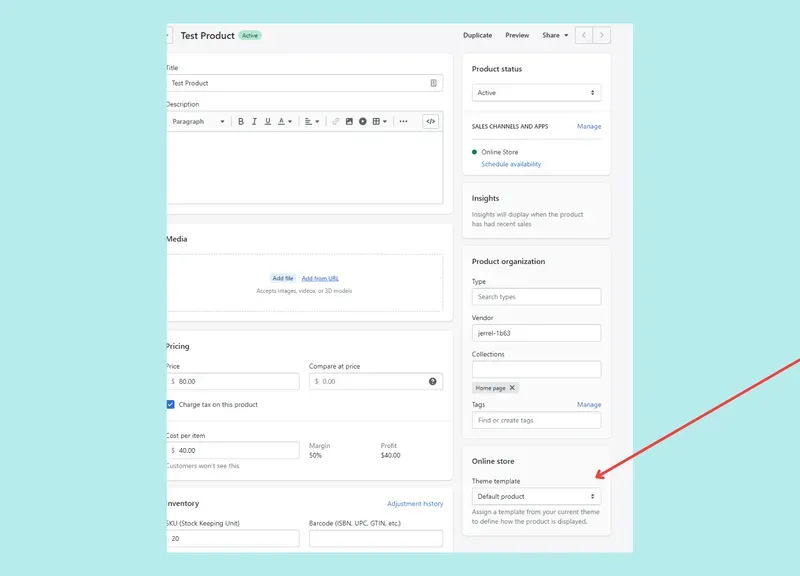
To change the template of a product on Shopify, the following steps are needed:
- Go to the Products tab in the admin panel.
- Choose the product for which the template needs to be applied.
- On the product page screen, locate the Theme template dropdown menu.
- Select the desired new template to be applied.
- Finally, click Save to apply the changes.
2 Quick & Easy Shopify Customizations with High Impact
Here are two simple adjustments that can be implemented in any store to enhance its conversion rate as soon as today.
1. Customize your a checkout page
The Shopify Checkout Page stands as a pivotal component of any store, marking the point where every customer finalizes their purchase. Hence, it’s imperative that this page is optimized to perfection.
Creating a stellar checkout page can significantly enhance conversions, and it’s straightforward with the right approach. Here’s how to refine the checkout process:
- Offering the option to create customer accounts, but not mandating it
- Condensing the checkout forms to streamline the process
- Renaming shipping options to reflect estimated delivery times
- Incorporating customer support avenues
- Providing a variety of payment methods
- Introducing one-click upsells immediately after checkout
For a more comprehensive insight into customizing the checkout experience, one might explore the detailed guide on crafting the ideal Shopify checkout page.
2. Customize your a thank you page
A customized checkout page can significantly increase conversions, and pairing it with a tailored thank you page can further amplify sales and elevate profits.
Here are a few straightforward modifications that can transform a thank you page with a 0% conversion rate into a revenue-generating asset:
- Incorporate personalized cross-sell suggestions based on the customer’s purchase
- Introduce a scarcity-driven offer through a pop-up to engage customers
- Capture customer birthdays and implement an email automation for sending birthday discounts
- Highlight top-selling products and collections
- Utilize a post-purchase survey to collect valuable customer feedback
- Include social sharing options, allowing customers to share their purchases
5 Shopify Customization Best Practices
Here are five principles to guide anyone when customizing their Shopify store:
Simplicity is Key: Adding too many widgets to a page can frustrate and confuse visitors. It’s important to consider whether each new section contributes to a better conversion chance without adding clutter. If it doesn’t, reconsider its necessity.
Design with Mobile Users in Mind: With over 50% of website visits coming from mobile devices, it’s crucial to create responsive designs. Using Google’s Mobile-Friendly Test can provide a performance report and suggestions for improvement. The Electro theme, available at Shopify themes, is worth exploring for those prioritizing mobile design, as its demo pages have achieved high Google Pagespeed scores on mobile devices.
Learn about Information hierarchy: The layout of webpages significantly affects conversion rates.
Add accent colors to create focal points: Utilizing accent colors can help highlight important areas on a page, such as the checkout page, not just to add visual interest but to guide visitors’ attention.
Make Your CTAs Pop: Every page should have a clear purpose and an associated Call To Action (CTA) that stands out. Using high-contrast colors and appealing button designs can ensure CTAs draw attention and encourage action.
Shopify Customization: The Wrap Up
Customizing an online store can appear to be a huge challenge for business owners.
Navigating the theme editor, selecting the ideal design, and choosing the right colors for the store involves a significant learning curve. Furthermore, developing a unique theme presents its own set of challenges.
This Shopify customization guide is designed to provide a helping hand in crafting a store that effectively converts visitors into customers.
FAQ
Can you customize your Shopify Store?
All Shopify stores offer customization options, though some themes provide greater flexibility in customization compared to others.
How do I customize my Shopify layout?
The Shopify theme editor allows for the editing of layouts on most site pages of a store. Using the template section, multiple layouts can be created to provide various options for each page.
How do I customize my Shopify Theme locally?
For those opting to directly edit Shopify code, it’s possible to copy the code to a local file and make edits in a personal staging environment. After the modifications are complete, the updated code can be transferred back to the Shopify platform.
How customizable is Shopify?
Shopify stands out as a highly-customizable eCommerce platform. Considering the vast array of add-ons, apps, and themes available for customization, it presents practically limitless options for merchants.
Can you customize Shopify code directly?
Shopify enables merchants to directly modify the code of their stores. However, it is not recommended to do so without extensive coding knowledge in Shopify development, as there’s a risk of compromising the store’s functionality.
Where do I find a Shopify theme dev?
Platforms such as Upwork offer opportunities to find Shopify theme developers, but they are not the sole option available.
Other alternatives include Fiverr, LinkedIn, and People Per Hour. The recommendation is to primarily consider Upwork and LinkedIn, as these platforms generally feature developers of higher quality compared to others.
Markdown 18221 bytes 2839 words 241 lines Ln 76, Col 66
HTML 14926

